First Java Program | Hello World Example
In this session today will learn how to write the very basic simple program using Java. We can write a simple hello Java program easily after installing the JDK.
To write a basic Java program, first you need to create a class with main method.
The requirement for Java Hello World Example
First install the Java software.
- 1. Install JDK (Java Development Kit), refer following link to download the software, download the JDK and install it.
- 2. Set path of the jdk/bin directory.
- 3. Create the Java program.
- 4. Compile and run the Java program.
Creating Hello World Example
    class Simple{
        public static void main(String args[]){
        System.out.println("HelloWorld");
        }
    }
Save the above file as Simple.java.
To compile:javac Simple.java
To execute:
java Simple
Output: HelloWorld
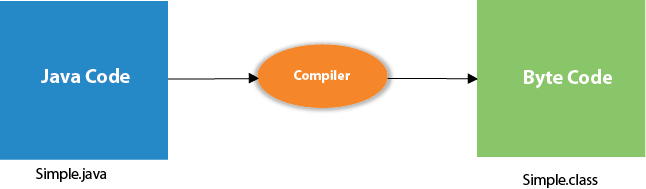
Compilation Flow:
Once you compile the program (javac), the Java compiler first it will converts the source to byte code.
Parameters used in First Java Program
- class keyword which helps to declare a class in Java.
- public keyword is an access modifier that represents visibility. It means it is visible to all.
- static is a keyword. You need to declare the main method as static, to access the method without object creation. The main() method is executed by the JVM, while executing JVM will not create an object to invoke the main() method.
- void is the return type of the method. It means it doesn't return any value.
- main represents the starting point of the program.
- String[] args or String args[] is used for command line argument. We will discuss it in coming section.
- System.out.println() is used to print statement. Here, System is a class, out is an object of the PrintStream class, println() is a method of the PrintStream class. We will discuss the internal working of System.out.println() statement in the coming section.
Follow below steps to write a java program
Step1: Open notepad
Step2: Write a java program
        class Helloworld {
        public static void main(String args[]){
            System.out.println("HelloWorld");
        }
    }
Step3: Create a new folder in D drive or C drive with the name as nits_java
Step4: Save the file into D:\nits_java folder class name as file name
Step5: Once we saved the file open the command prompt (CMD)
Step6: Navigate to the D drive D:
Step7: Next navigate to the java file saved directory cd D:\nits_java
Step8: Next compile the program javac filename.java [javac Helloworld.java]
Step9: Validate the errors if any
Step10: Rectify the errors and re-compile the program
Step11: Execute the program
Step12: Validate the output.
Command prompt simple commands
- 1. Command to change the drive from C drive to D drive = D:
- 2. Command to change the drive from D drive to C drive = C:
- 3. Command to change the directory cd path
- 4. List down the files: dir