SpringBoot-Kafka Tutorial
Apache Kafka Producer: SpringBoot Microservices
In this lesson, will learn how to publish an events to kafka broker using Springboot microservice, not using the termianl windown, actually will create a new SpringBoot microservice which act as a kafka producer. Kafka producer is a spring boot microservice that publishes events to Kafka Broker. In the following lessons, you will learn how to create this Spring Boot microservice and how to configure it to act as Kafka producer.
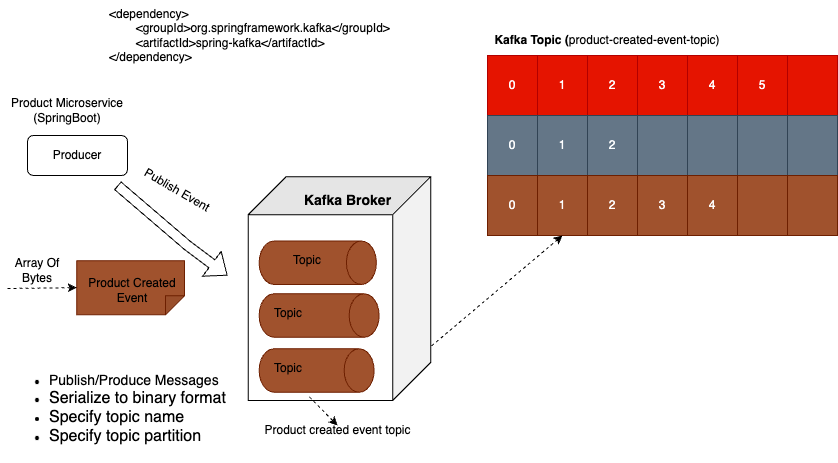
So the primary role of Kafka Producer is to publish messages or events to one or more Kafka topics. In a Spring boot application, this is typically achieved using spring for Apache Kafka library, which simplifies the process of integrating Kafka functionality into your spring application.
Before sending a message, Kafka producer serializes it into a byte array. So another responsibility of Kafka Producer is to serialize messages to binary format that can be transmitted over the network to Kafka brokers.
Another responsibility of Kafka producer is to specify the name of Kafka topic, where these messages should be sent. In this particular use case, I call Kafka topic, the product created event topic, and it will store product created events.
When sending a new message to Kafka topic, we will also specify the partition where we want to store it, although this parameter is optional and if we do not specify topic partition, then Kafka Producer will make this decision for us. And if neither partition nor key is provided, then Kafka producer will distribute messages across partitions in a round robin fashion, ensuring a balanced load.
If a partition is not specified but a message key is provided, then Kafka will hash the key and use the result to determine the partition, and this ensures that all messages with the same key go to the same partition. So another responsibility of Kafka producer is to choose which partition to write event data to.
Kafka Producer: Synchronous & Asynchronous communication style
There are a couple of different ways that Kafka producer can send messages to Kafka Broker. It can be synchronous communication style, or asynchronous communication style.
Synchronous communication style:
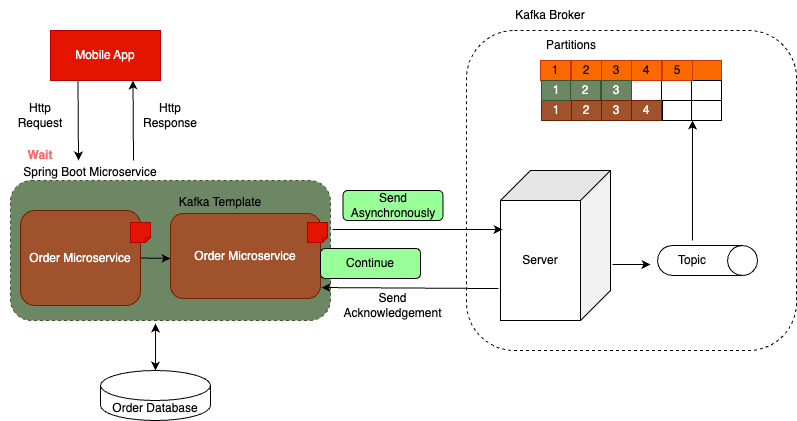
- ◈ let's assume that we have a mobile application that sends a Http request to orders microservice.
- The order microservice application exposes API endpoints that allow to place new order, view existing orders, cancel orders and track order status etc..
- ◈ In this particular case, the order microservice will likely use the synchronous communication style and it will wait for a response, because it does want to know the order was successfully created or not. So synchronous communication style is when sender sends a request and then waits for a response before proceeding.
- ◈ Kafka Producer will provides a very user friendly way to interact with Kafka from Spring Boot application. So our orders microservice will create a new object, called Order Created Event, and it will use Kafka Producer to send a message to Kafka Broker.
- ◈ If orders microservice wants to know that the order created event was successfully stored in Kafka Broker, it will use Kafka Producer to send Kafka message using synchronous communication style, which means that it will wait for acknowledgement from Kafka Broker to confirm that the message was successfully received and stored before it proceeds with sending next message or performing other operations. Because Kafka Producer is waiting to receive a response, it is blocked or it is on hold until the response from Kafka Broker is received.
- ◈ Once Kafka Broker successfully stores Kafka message in a topic, it will send the response to Kafka Producer. Once Kafka producer receives this acknowledgement that the message is stored successfully, then order microservice will respond back to mobile application with Http response.
- ◈ So in above diagram, I used synchronous communication style between mobile application and spring boot microservice, between Kafka Producer and Kafka Broker. Using synchronous communication style between Kafka Producer and Kafka broker is considered to be more reliable because it ensures that message was successfully stored before moving on to the next task.
Asynchronous communication style
- ◈ let's assume that we have a mobile application that displays user login page. Before user can proceed, they will need to enter their username and password to authenticate. Once user enters their username and password and taps on login button, mobile application will send a Http request to a login API endpoint. In this case, mobile application will use synchronous communication style and will wait for Springboot microservice to respond.
- ◈ Let's assume that user authentication is handled by authentication microservice. Authentication microservice will check its database to see the user provided username and password exists, and if authentication is successful, it will create a new user logged in event. It will then use Kafka Producer to publish this event to Kafka Broker.
- ◈ Now the purpose of this user logged in event is only informational and it is needed for analytics purposes only. Even if this event fails and does not get stored in Kafka topic, we don't want our user to wait or receive error message. So in this case, we make Kafka producer send message asynchronously.
- ◈ If we send message asynchronously, Kafka producer will not be blocked, it will not be put on hold and will continue its execution right away and because user authentication is successful, our microservice will return a successful Http response. So the user of mobile application will log in and will start using it without waiting for Kafka Broker to acknowledge that it has received an event.
- ◈ Meanwhile, because user logged in event was published, Kafka Broker will receive it and it will store it in Kafka topic. But even if this operation fails and Kafka Broker does not store this event successfully, it will not affect user of our mobile application. Now, even though Kafka producer does send message asynchronously if needed, we can still make our microservice receive and process response from Kafka Broker. Once Kafka Broker sends its acknowledgment, we can handle it and process it with asynchronous callback function.
Create new SpringBoot Project
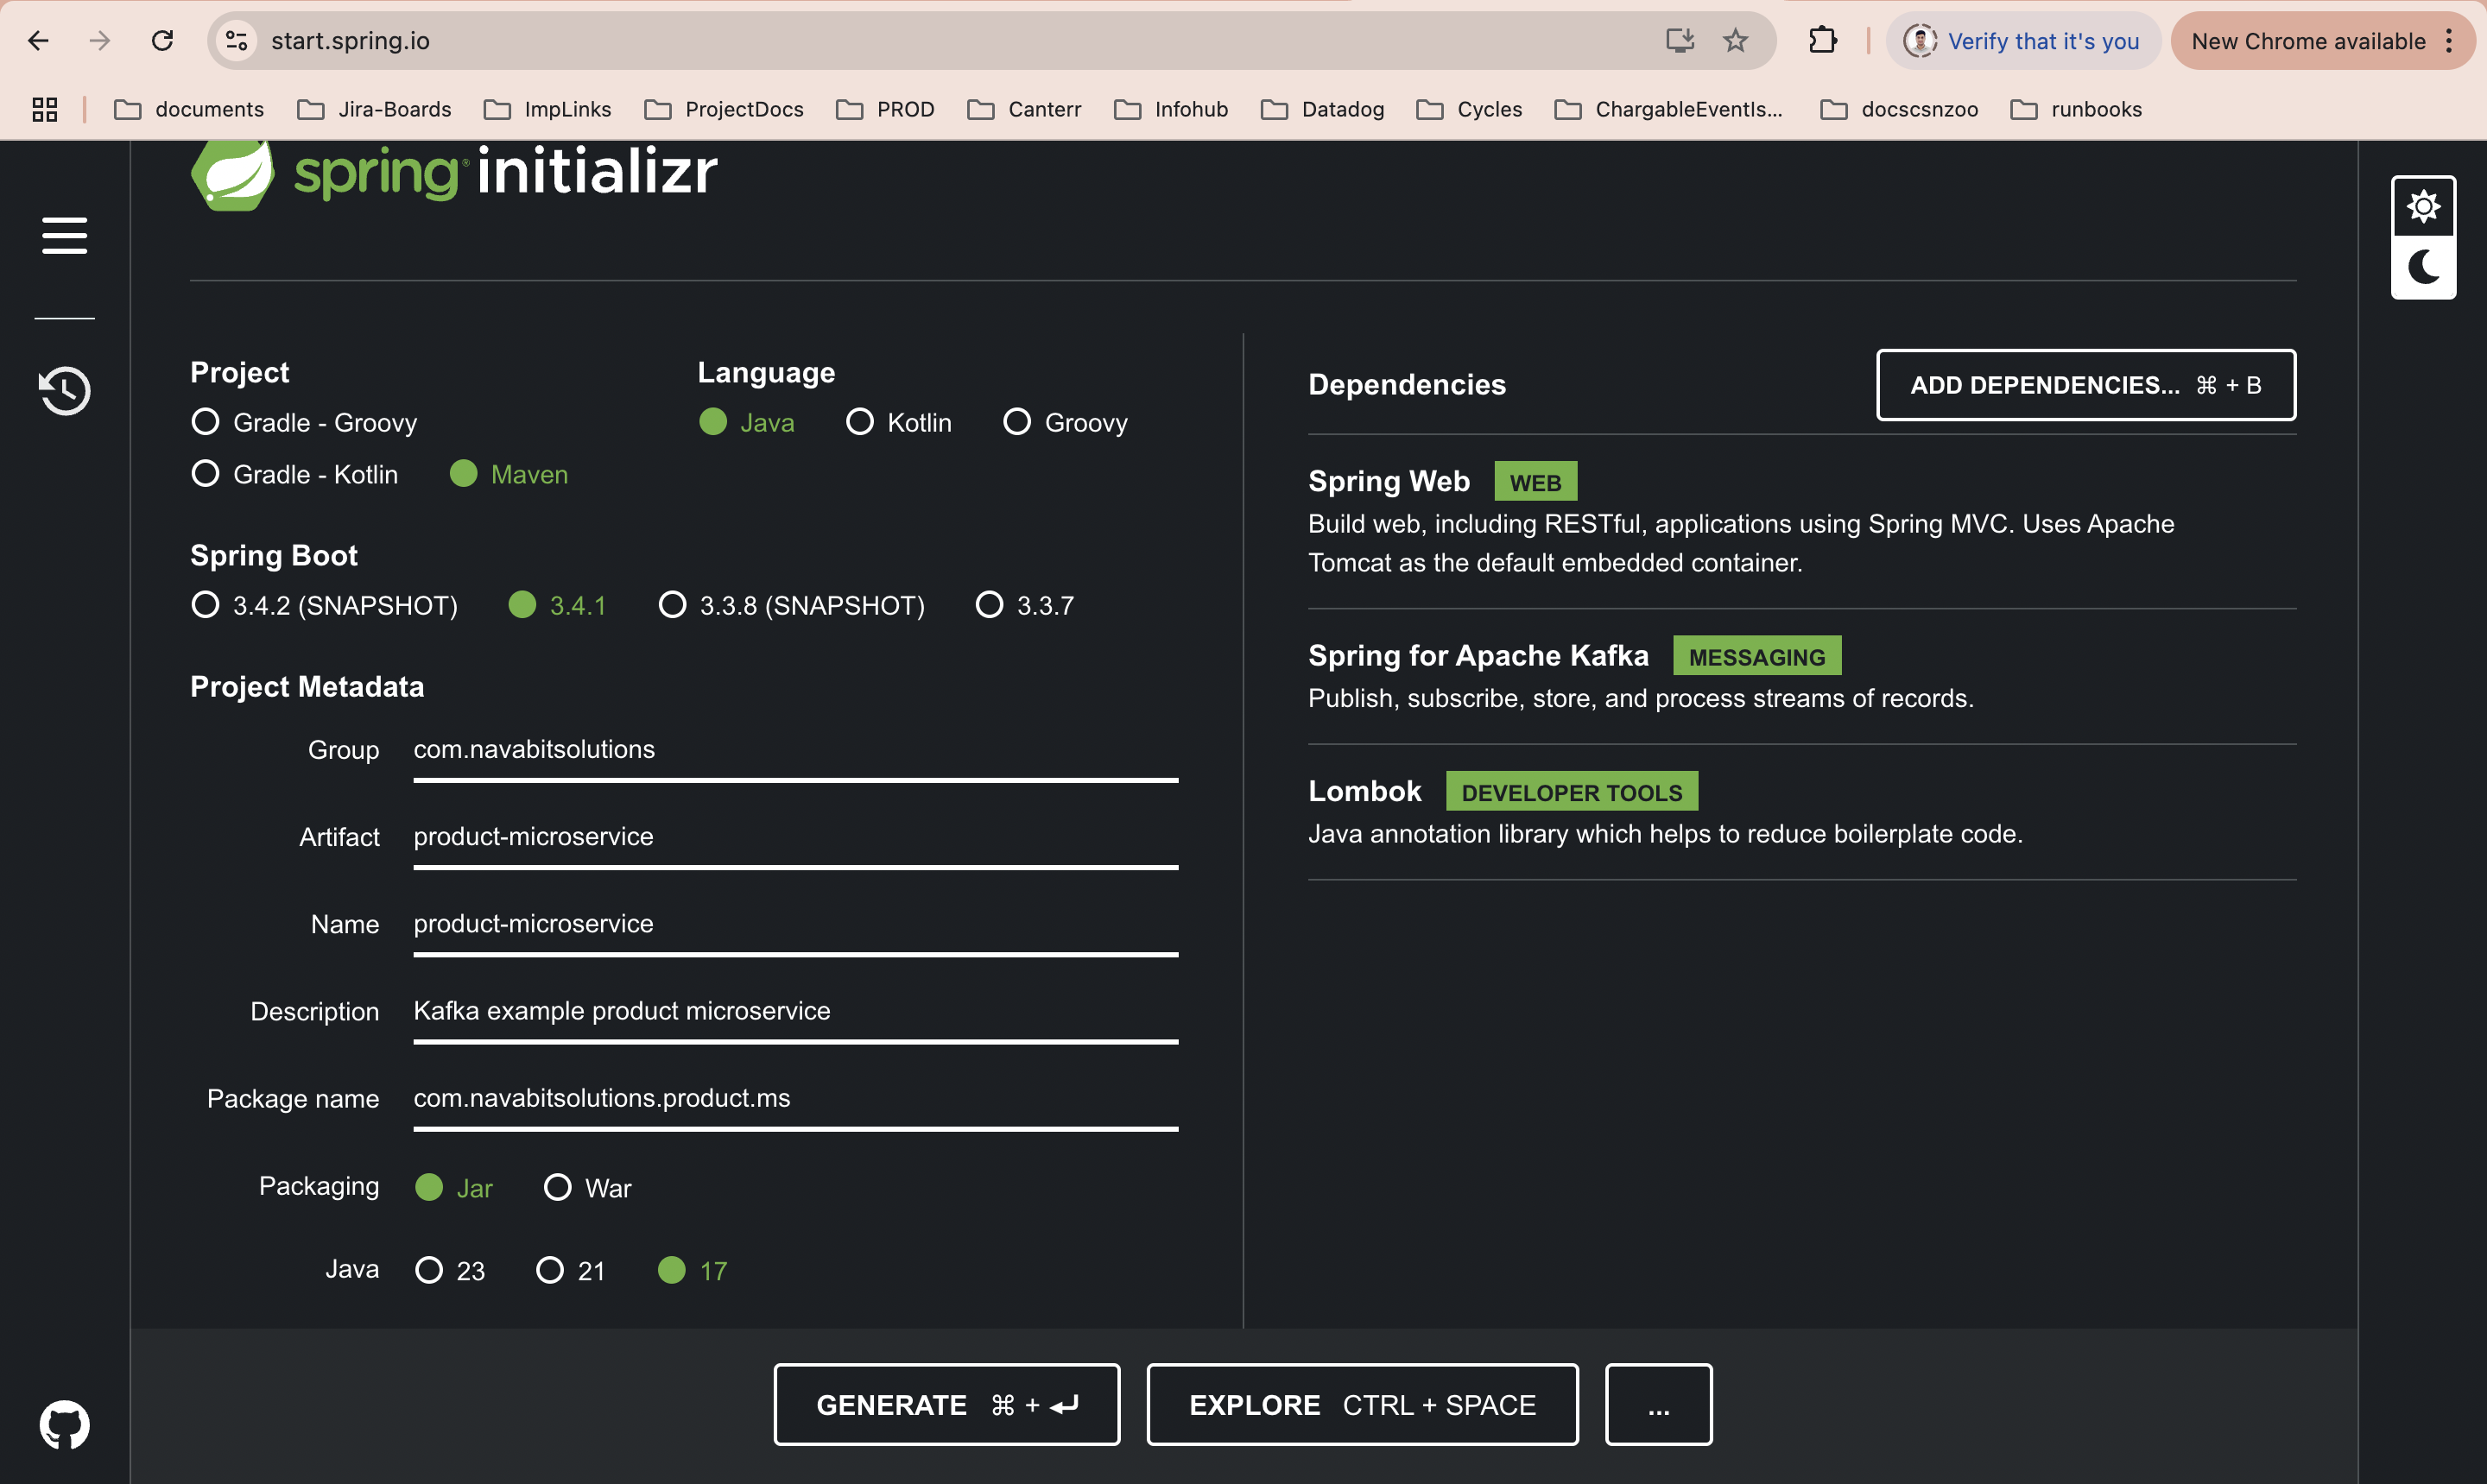
To create a new SpringBoot microservice project first you need to navigate to the start.spring.io. Next select project a as Maven, language as Java and then next select the SpringBoot version (I am selecting 3.4.1). Next we need to fill the Project Metadata then next packing as Jar and Java version as 17.
Next add the following dependencies and click on Generate button.
- 1. Spring Web
- 2. Apache for Kafka
- 3. Lombok
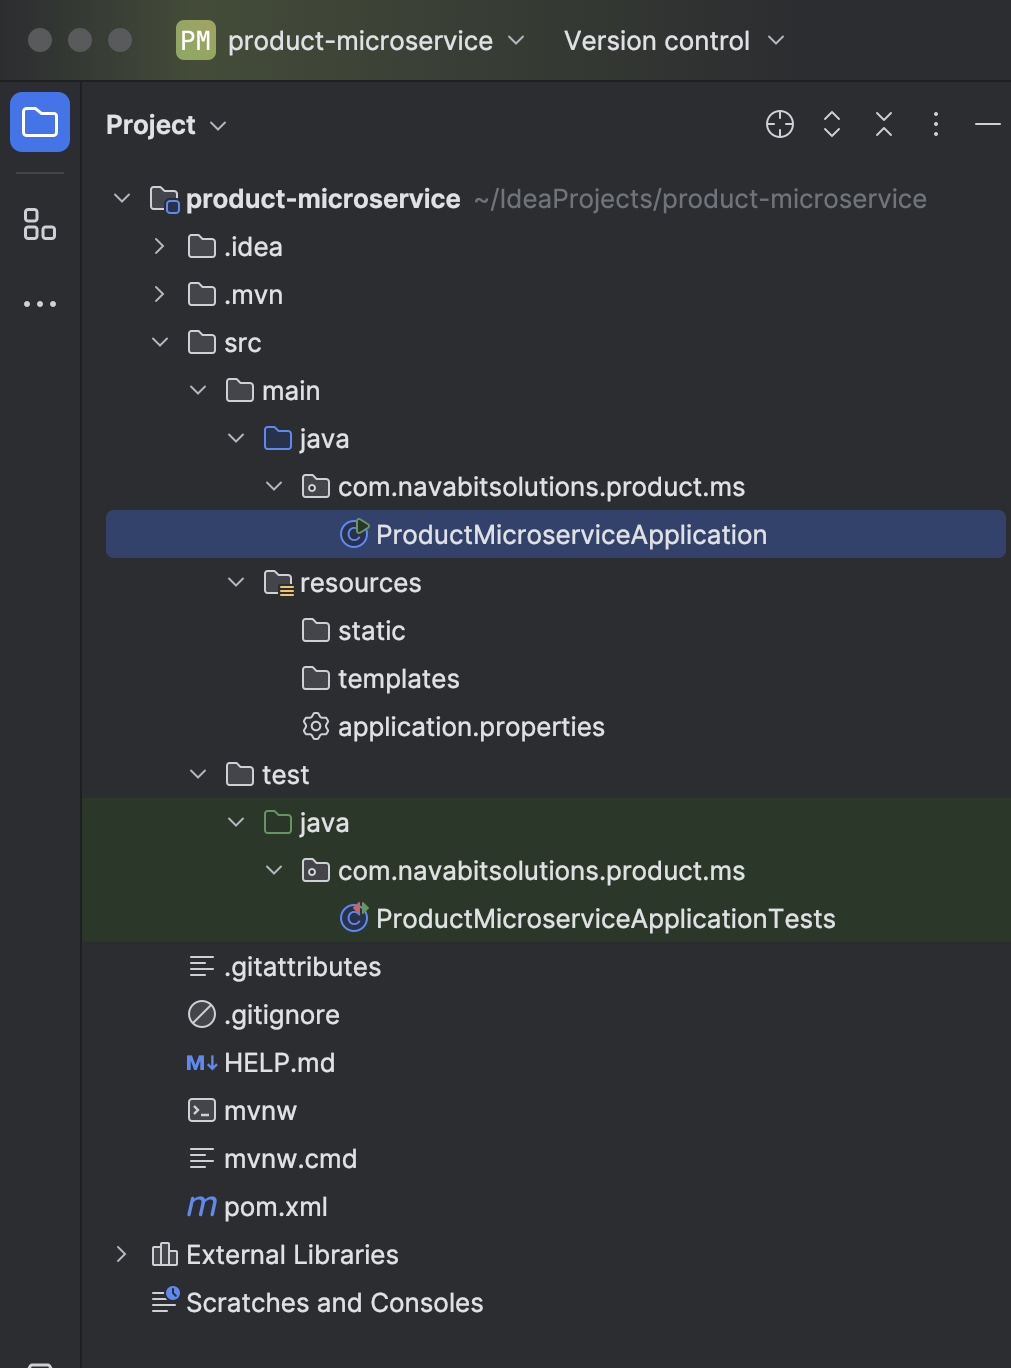
Once project has been downloaded import the same project into your IntelliJ IDEA. And it looks like below in IDE
SpringBoot Configuration Property changes
- 1. server.port=0 First you need to set the port number to zero, it will make the spring boot application start up on a random port number.
- 2. spring.kafka.producer.bootstrap-server=localhost:9092,localhost:9094 Next configure the bootstrap servers. This configuration property is used to specify bootstrap servers for Kafka producer in your spring boot application. At least one bootstrap server is needed for development purposes on your local computer. One server is enough, but if you have more brokers in your cluster, then it is better to provide at least two bootstrap servers here. And this is because if one bootstrap server is down, the second bootstrap server can still be used to establish this initial connection with the cluster.
- 3. spring.kafka.producer.key-serializer=org.apache.kafka.common.serialization.StringSerializer Next add the key serializer. This configuration property is used to specify the serializer for message keys.
- 4. spring.kafka.producer.value-serializer=org.springframework.kafka.support.serializer.JsonSerializer Next add the value serializer. This configuration property is used to specify the serializer for message value.
Create a kafka topic using springboot application
To create a kafka topic first we need to create a kafka configuration class under the root package of the maven package. Next add the below code snippet to create a kafka topic
    package com.navabitsolutions.product.ms;

    import org.apache.kafka.clients.admin.NewTopic;
    import org.springframework.context.annotation.Bean;
    import org.springframework.context.annotation.Configuration;
    import org.springframework.kafka.config.TopicBuilder;

    import java.util.Map;

    @Configuration
    public class KafkaConfig {

        @Bean
        NewTopic createTopic() {
            return TopicBuilder.name("product-created-event-topic")
                    .partitions(3)
                    .replicas(1)
                    .build();
        }
    }
Follow the below steps next.
- 1. First bring up the kafka broker.
- 2. Next run the spring boot application.
- 3. Once springboot application is successfully started then next verify the kafka tipic using CLI.
- 4. ./bin/kafka-topics.sh --describe --bootstrap-server localhost:9092
- 5. Verify the topic with specific topic name ./bin/kafka-topics.sh --describe --bootstrap-server localhost:9092 --topic product-created-events-topic

Create Request Object
Under the com.navabitsolutions.product.ms.request package create a ProductRequest class.
    package com.navabitsolutions.product.ms.request;

    import lombok.AllArgsConstructor;
    import lombok.EqualsAndHashCode;
    import lombok.Getter;
    import lombok.ToString;
    import lombok.NoArgsConstructor;
    import lombok.Builder;

    import java.math.BigDecimal;

    @Getter
    @ToString
    @NoArgsConstructor
    @EqualsAndHashCode
    @AllArgsConstructor
    @Builder(builderClassName = "Builder", setterPrefix = "with")
    public class ProductRequest {
        private String title;
        private BigDecimal price;
        private Integer quality;
    }
Create RestController
Under the com.navabitsolutions.product.ms.controller package create a ProductController class.
    package com.navabitsolutions.product.ms.controller;

    import com.navabitsolutions.product.ms.request.ProductRequest;
    import org.springframework.http.HttpStatus;
    import org.springframework.http.ResponseEntity;
    import org.springframework.web.bind.annotation.RequestBody;
    import org.springframework.web.bind.annotation.RequestMapping;
    import org.springframework.web.bind.annotation.RestController;

    @RestController
    @RequestMapping("/api/v1/product")
    public class ProductController {

        public ResponseEntity<String> createProduct(@RequestBody ProductRequest productRequest) {
            return ResponseEntity.status(HttpStatus.CREATED).body("");
        }
    }
Create RestController
Under the com.navabitsolutions.product.ms.controller package create a ProductController class.
    package com.navabitsolutions.product.ms.controller;

    import com.navabitsolutions.product.ms.request.ProductRequest;
    import com.navabitsolutions.product.ms.service.ProductService;
    import lombok.RequiredArgsConstructor;
    import org.springframework.http.HttpStatus;
    import org.springframework.http.ResponseEntity;
    import org.springframework.web.bind.annotation.RequestBody;
    import org.springframework.web.bind.annotation.RequestMapping;
    import org.springframework.web.bind.annotation.RestController;

    @RestController
    @RequestMapping("/api/v1/product")
    @RequiredArgsConstructor
    public class ProductController {

        private final ProductService productService;

        public ResponseEntity<String> createProduct(@RequestBody ProductRequest productRequest) {
            String productId = productService.createProduct(productRequest);
            return ResponseEntity.status(HttpStatus.CREATED).body(productId);
        }
    }
Create a Service Layer
In service layer first we need to create an interface i.e ProductService.java with once abstract method called createProduct. Once it has been created then next we need to create a service implementation class to write the business logic.
    package com.navabitsolutions.product.ms.service;

    import com.navabitsolutions.product.ms.request.ProductRequest;

    public interface ProductService {
        String createProduct(ProductRequest productRequest);
    }
    package com.navabitsolutions.product.ms.service;

    import com.navabitsolutions.product.ms.events.ProductCreatedEvent;
    import com.navabitsolutions.product.ms.request.ProductRequest;
    import org.slf4j.Logger;
    import org.slf4j.LoggerFactory;
    import org.springframework.kafka.core.KafkaTemplate;
    import org.springframework.kafka.support.SendResult;
    import org.springframework.stereotype.Service;

    import java.util.UUID;
    import java.util.concurrent.CompletableFuture;

    @Service
    public class ProductServiceImpl implements ProductService {
        private final Logger LOGGER = LoggerFactory.getLogger(this.getClass());
        KafkaTemplate<String, ProductCreatedEvent> kafkaTemplate;
        public ProductServiceImpl(KafkaTemplate<String, ProductCreatedEvent> kafkaTemplate) {
            this.kafkaTemplate = kafkaTemplate;
        }

        @Override
        public String createProduct(ProductRequest productRequest) {

            String productId = UUID.randomUUID().toString();
            ProductCreatedEvent productCreatedEvent = ProductCreatedEvent.builder()
                    .withProductId(productId)
                    .withTitle(productRequest.getTitle())
                    .withPrice(productRequest.getPrice())
                    .withQuality(productRequest.getQuality())
                    .build();
            CompletableFuture<SendResult<String, ProductCreatedEvent>> future =
                    kafkaTemplate.send("product-created-events-topic", productId, productCreatedEvent);
            future.whenComplete((result, exception) -> {
                if (exception != null) {
                    LOGGER.error("Failed to send messages {}", exception.getMessage());
                } else {
                    LOGGER.info("Message sent successfully {}", result.getRecordMetadata());
                }
            });

            return productId;
        }
    }
In above class we added the @Service annotation, it will mark this class as a special component and it indicate that this class contains a business logic, and also at the time of application startup it will create an instance of this class and added to the SpringApplicationContext. Once the object is available in SpringApplicationContext we can use spring dependency inject to inject this class into other classes.
Create Event Object
Create a ProductCreatedEvent object under the package called package com.navabitsolutions.product.ms.events
    package com.navabitsolutions.product.ms.events;

    import lombok.AllArgsConstructor;
    import lombok.EqualsAndHashCode;
    import lombok.Getter;
    import lombok.ToString;
    import lombok.NoArgsConstructor;
    import lombok.Builder;

    import java.math.BigDecimal;

    @Getter
    @ToString
    @NoArgsConstructor
    @EqualsAndHashCode
    @AllArgsConstructor
    @Builder(builderClassName = "Builder", setterPrefix = "with")
    public class ProductCreatedEvent {
        private String productId;
        private String title;
        private BigDecimal price;
        private Integer quality;
    }
How it works
Post implementation of spring boot product microservice, next we need to run the application to validate is producer microservice is producing the messages and publishing to kafka topic or not. To validate this first we need to bring up the kafka server or broker. Next using kafka CLI command we need to check is consumer is able to consume the message or not.
Run following command to bring up the kafka server: ./bin/kafka-server-start.sh config/kraft/server.properties
Run following command to read the kafka messages using Kafka-CLI consumer ./bin/kafka-console-consumer.sh --topic product-created-events-topic --bootstrap-server localhost:9092 --property print.key=true
Once the product microservice is up and running, we need to use the postman to fire the REST-API call, using below endpoint and request payload.
endpoint: POST: http://localhost:52713/api/v1/product/create
    {
        "title": "iPhone14",
        "price": 140000,
        "quality": 10
    }
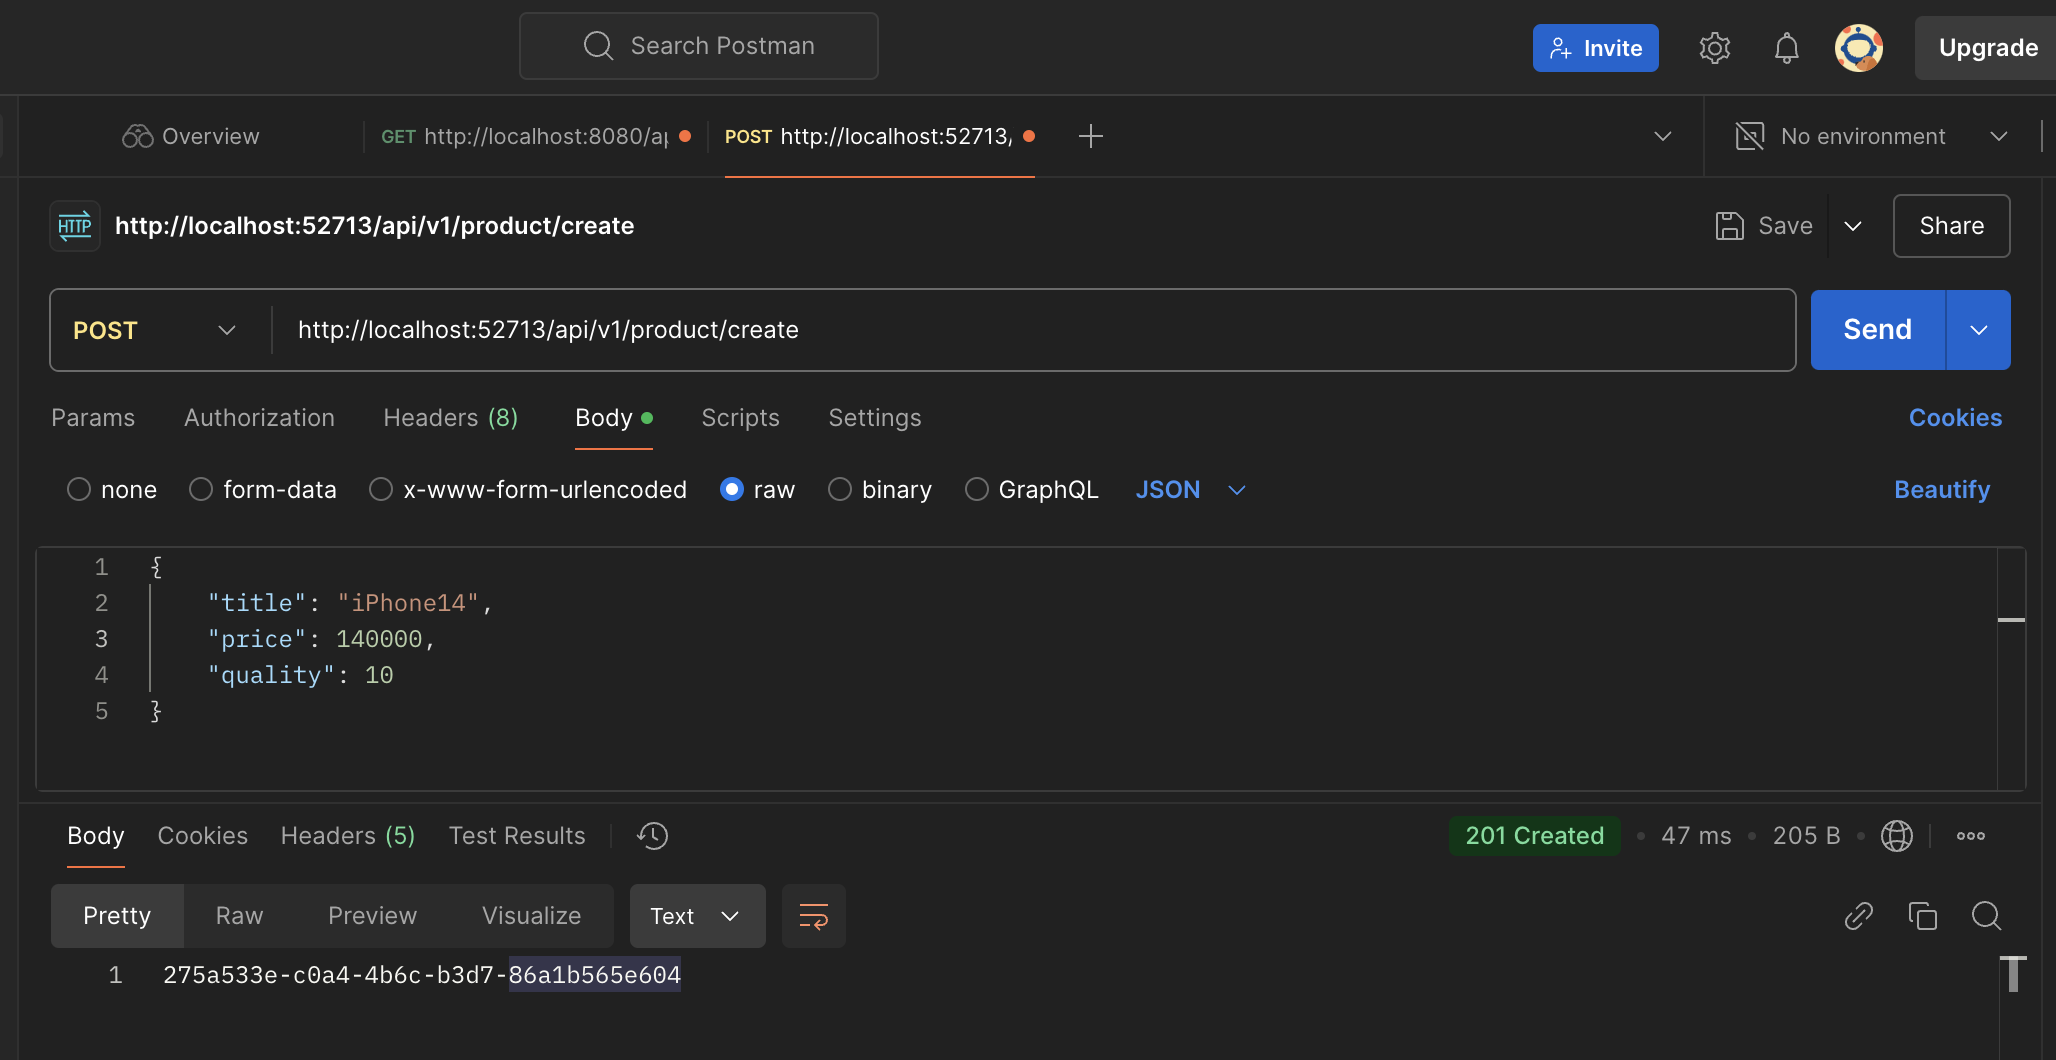
Once we receive the successful response, we can check the Kafka-CLI command line consumer to check is the message has been consumed from the topic or not. For that open the terminal which we already ran before we fire the request.

Send message synchronously
There are two diffierent way to send the message synchronously to kafka topic.
- 1. simply we need to add the join() method before returning the productId in service implementation class like future.join()
- 2. Remove the CompletableFuture and whenComplete fuction from the service implementation class and simply add the below code.
SendResult<String, ProductCreatedEvent> result = kafkaTemplate.send("product-created-events-topic", productId, productCreatedEvent).get(); Here, the get() method will throw two different exception java.lang.InterruptedException, java.util.concurrent.ExecutionException, please handle or throw the exception.